

Whether you’re a professional photographer or an amateur with a keen interest, mastering the basics of photo editing can drastically improve the quality of your images.
In my experience, understanding editing techniques can transform a good shot into a great one. In this guide, I will share some essential tips and techniques to help you enhance your images with photo editing.
So let’s delve into the topic of photo editing for beginners.
What is Photo Editing?
Photo editing, or post-processing, involves modifying an image to improve its quality, correct flaws, or add creative elements.
Photo editing for beginners starts with basic edits like cropping, adjusting brightness and contrast, and color correction before moving on to more advanced techniques.
Lightroom vs. Photoshop - Which One to Choose?

Choosing the right software depends on your specific needs, level of expertise, the complexity of the tasks, and your overall objectives.
Adobe Lightroom
When to Choose: Lightroom is a software that offers the best photo editing for beginners. It’s ideal for photographers who work with many photos. Lightroom is designed for quick, efficient, and bulk editing, like adjusting exposure, white balance, contrast, and color balance for a group of photos at once. It’s perfect for when you need to manage, organize, and do basic post-processing of a large number of image.
Situations to Choose: Choose Lightroom for tasks like importing/sorting photos, post-processing RAW files, organizing images, doing basic retouches like adjusting exposure, color, and tone, and bulk editing. Lightroom is a good choice if your primary objective is to make your photos look better without altering them dramatically.
Sharpen Your Photography Skills in One Afternoon
Download my free guide with 10 expert techniques that took me years to master. You’ll discover the simple shifts that separate amateur shots from frame-worthy photos.
Join 300+ photographers already leveling up their skills
Adobe Photoshop
When to Choose: Photoshop is more powerful and complex than Lightroom, providing more precise and granular control over image manipulation. It’s a good choice for professionals who need advanced tools and features and an excellent tool for graphic designers, artists, and professionals who need more than just basic editing.
Situations to Choose: Choose Photoshop when you need to make substantial changes to your images, like adding, removing, or altering elements in the photograph, working with layers, creating composite images, applying complex effects, or doing professional retouching. If your objective is to create graphics and artwork or substantially alter the photos, Photoshop would be the right choice.
PRO TIP: Many photographers, including myself, use Lightroom for quick edits and organization and then switch to Photoshop for more complex improvements before returning to Lightroom for final touches.
Adobe has designed these two programs to be complementary, so choosing between the two often depends on the task and your personal preferences. It’s not a binary choice; you can use the two synergistically.
What to Do Before Editing Your Photos?
Choosing the Right Software
The basics of photo editing start even before the actual editing. As mentioned, the first step in photo editing is selecting the right software. I recommend starting with Lightroom for beginners, as it provides a more intuitive interface and is easier to master.
Shooting in RAW Format

Regarding photo editing, the RAW vs. JPEG debate has a clear winner.
Think of RAW as a digital negative. It captures all the data your camera’s sensor records when you take a photo. Some of this information gets lost if you take pictures in JPEG format, restricting your ability to edit the image later.
For example, if you took a picture of a sunset in JPEG, you might lose the fine details in the cloud formations. But if you took the same photo in RAW, you would retain those details and could accentuate them during editing. Switching to RAW can be done in your camera settings.
Basic Photo Editing Techniques
Correcting Exposure
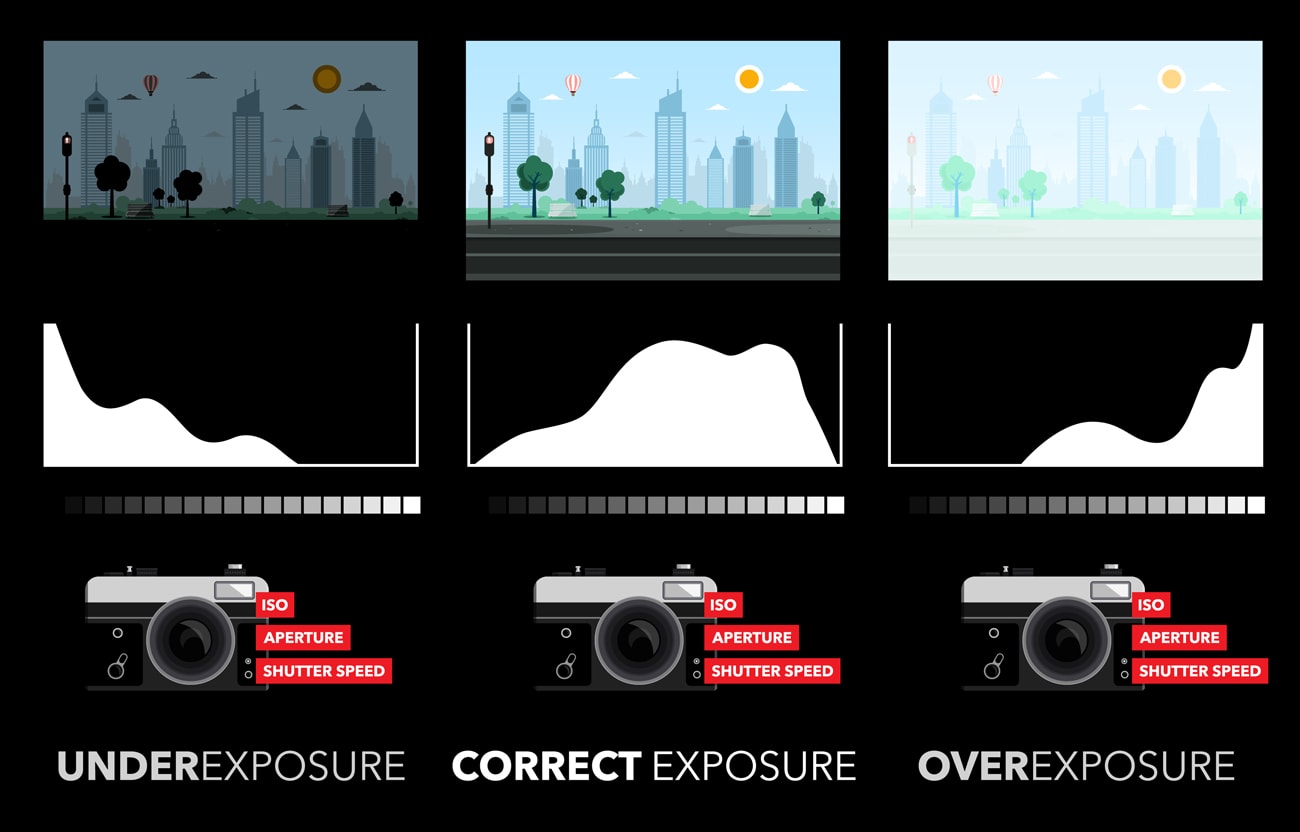
This is one of the most basic photography editing tips. Exposure refers to how light or dark your photo is. Imagine taking a picture of a friend standing in front of a window. If the photo is too dark (underexposed), your friend will look like a silhouette. If it’s too light (overexposed), your friend will look washed out.
Using the Exposure slider in your editing software can correct this. You can also use the histogram, a graphical representation of the tonal values in your image, to guide you. Your image is likely overexposed if the graph is skewed to the right. If it’s skewed to the left, it’s underexposed.
Selecting the Right White Balance
White balance corrects color casts in your images, making white objects appear white as they should. For instance, let’s say you took a photo of a snowman, but the snow seems bluish due to the light source. Adjusting the white balance in your editing software can make the snow appear true white again.
Cropping and Straightening
Another one of the photo editing basics is cropping. By removing unwanted elements from the frame, you can draw attention to the subject. Use the gridlines to ensure your photo is straight and well-composed.

Boosting Contrast
Contrast is the difference between the lightest and darkest parts of your image. If you took a picture of a zebra, boosting the contrast would make the black stripes darker and the white stripes lighter. This can make the image more visually appealing. Be careful, though, as too much contrast can distort the image.
NOTE: One of the most important photo editing tips for beginners is to avoid over-editing! Overly bright or contrasted images can look unnatural and lose detail.
Free Lightroom Course for Parents. Create Natural, Professional Family Photos
Learn how to make your family photos bright, natural, and frame-worthy, even if you’re brand new to Lightroom.
Adjusting Saturation
Saturation relates to the intensity of colors in your image. If you took a photo of a rainbow and felt the colors were dull, you could use the saturation slider in your editing software to make those colors more vibrant.
Reducing Noise and Increasing Sharpening
Noise is the digital equivalent of grain in film photography. It appears as tiny, randomly-placed colored pixels that can reduce the overall quality of your image. On the other hand, sharpening can enhance your image’s details.
If you took a picture of a cat, sharpening would make the individual hairs stand out more clearly, while reducing noise would smooth out the image.

Advanced Photo Editing Techniques
Once you’ve mastered the basics, you can move on to more advanced techniques to take your photos to a new level, adding a professional touch to your work
Layer Masking
Layer masking is a reversible way to hide part of a layer. It gives the user precise control over the transparency of specific areas within an image, making it a versatile and widely-used tool in photo editing. This method can be used to combine multiple images, alter particular sections of an image, or create unique effects.
Frequency Separation
This retouching technique separates the texture and tone/color of an image into two different layers. This allows you to work on the color and tone of the skin without affecting the texture and vice versa. This technique is handy for portrait photography.
Luminosity Masks
Luminosity Masks create masks based on the brightness of pixels in an image, allowing you to selectively adjust the brightness, contrast, and color of different tones in the picture. This is particularly useful in landscape photography, where it allows precise control over different parts of the image (like the sky versus the ground).
Dodging and Burning
These techniques originate from the traditional film photography darkroom process. Dodging lightens specific parts of an image, and burning darkens them. This can guide the viewer’s eye, emphasize certain parts of the photo, add depth, or correct exposure.
HDR Blending
High Dynamic Range (HDR) blending is a technique used to combine several photos with different exposure levels into one image with a broader dynamic range than a camera could capture in a single shot. This can reveal details in both the shadows and highlights, which is especially useful in landscape and architectural photography.
Compositing
This technique combines visual elements from separate sources into single images, often to create the illusion that all those elements are parts of the same scene. Compositing helps create surreal pictures or scenes that couldn’t occur in real life.
Text Overlays
This involves adding text to your image. You can use the text to add a title, a brief description, or even an entire story. Text overlays can be used creatively to add a new level of depth to an image.
Advanced Sharpening Techniques
Sharpening enhances the detail in your photo by increasing contrast along the edges of your image’s elements. Various techniques include Unsharp Mask, Smart Sharpen, and High Pass Sharpening. Different approaches work better depending on the specific image and the effect you’re aiming for.
Color Correction vs. Color Grading
Let’s delve into these two other fundamental aspects of photo editing: color correcting and color grading.
Color Correcting
Color correction is adjusting the colors in your photo to make them appear more accurate and natural.
This step usually precedes any other form of editing. Color correction involves balancing your photo’s color temperature, tint, exposure, contrast, highlights, shadows, whites, blacks, and saturation.
For instance, if a photo was taken in a room with yellow lights, the image may have a yellowish hue. Color correction would be used to neutralize this tint and make the colors appear as they would under neutral lighting.

Color Grading
Color grading, on the other hand, is a more creative process that comes after the color correction phase. This process involves creating the mood, atmosphere, and feel of the image by manipulating colors. You could warm up your photo for a sunny or nostalgic look or cool it down for a darker or somber tone.
The distinction between these two processes is essential because they have different objectives. You could think of color correction as fixing a photo to look natural, while color grading is about tweaking the image to evoke a mood or style.

Sharpen Your Photography Skills in One Afternoon
Download my free guide with 10 expert techniques that took me years to master. You’ll discover the simple shifts that separate amateur shots from frame-worthy photos.
Join 300+ photographers already leveling up their skills
If you are interested to learn more about color grading and psychology of color, I highly recommend you to watch the following video tutorial from Joanna Kustra:
COLOR GRADING PRO TIPS:
- When editing photos, start with color correction first. Once your image is color corrected, you can move on to color grading. In color grading, consider the mood you want to convey – experiment with different tones, contrasts, and saturation levels, but be careful not to overdo it.
- The digital age has made it easy to learn these techniques through various online platforms. Resources like YouTube provide free photo editing tutorials for beginners, online learning platforms such as Udemy and Skillshare offer courses, photography blogs, websites offer free articles and guides, and even official software websites like Adobe Photoshop provide software-specific guides. Online photography communities also serve as excellent platforms for knowledge exchange and learning.
- Keep an organized library of your images to make tracking your progress and revisiting past edits easier.
FAQs
What Is the Most Common Photo Editor Used?
How Do I Make My Photos Look Professional?
Making your photos look professional involves various steps, including:
- Understanding your camera: Knowing the ins and outs of your camera, including manual settings, can drastically improve the quality of your photos.
- Framing and Composition: Using principles such as the Rule of Thirds or leading lines can make your photo more appealing. If you are interested in learning more about various composition techniques, I recommend you to check out this article.
- Lighting: Good lighting is crucial. Natural light is often the most flattering, so understanding how to use natural light it is crucial.
- Post-processing: This includes adjusting exposure, contrast, saturation, sharpness, etc., in photo editing software.
- Practice: Like any skill, the more you practice, the better you’ll get. If you are interested in improving your photography skills quickly, I recommend trying the following photography exercise.
What Are Editing Styles?
Editing styles refer to an editor’s specific choices when post-processing a photograph. This includes decisions on color grading, contrast, brightness, saturation, cropping, etc.
Your editing style can be consistent across your work, creating a recognizable signature look, or it can vary depending on the mood or message of each photograph.
How Do I Start Editing?
To start editing photos, follow these steps:
- Choose your software: Many options are available, from professional software like Adobe Photoshop or Lightroom to free alternatives like GIMP or mobile apps.
- Learn the basics: Start with basic adjustments like brightness, contrast, saturation, and cropping.
- Understand layers and masks: If your software supports it, learning about them can give you greater control over your edits.
- Experiment: Try different tools and techniques to see what you like and develop your style.
- Practice: The more you edit, the better you’ll become. Use online tutorials and classes to help you learn and improve.
Free Lightroom Course for Parents. Create Natural, Professional Family Photos
Learn how to make your family photos bright, natural, and frame-worthy, even if you’re brand new to Lightroom.
Photo Editing for Beginners: Conclusion
Mastering the basics of photo editing can significantly improve the quality of your photos. With the right software and a basic understanding of photo editing tools and techniques, you can transform your photos into professional-looking art pieces.
Remember, the ultimate goal of photo editing is not to create a perfect photo but to enhance the story that your photo tells. After you’ve mastered the editing skills, you can further develop your own personal photography style.
Check out our other photography guides here on OhMyCamera.com to dive deeper into the world of photography.
Happy editing!
Related articles:
- Shooting in Manual Mode: How to Take Control of Your Camera
- An Introduction to Shutter Speed: A Beginner’s Guide
- Getting to Know Your Camera: All About Aperture in Photography
- The Essential Guide to Understanding ISO in Photography
- Efficiency and Style: Streamline Your Editing Workflow with Lightroom Presets
- Master Your Camera: A Deep Dive into Camera Shooting Modes