
An internal light meter in photography is a handy tool that can teach you so much. By reading the exposure meter in camera, you can adjust the shutter speed, aperture, and ISO settings until they match the ideal exposure for your shot. You can either do this manually or rely on your camera’s automatic mode to make adjustments for you.
Regardless of your shooting mode, I think using the camera exposure meter correctly is critical to obtaining well-exposed photos. If you don’t know how to use the light meter, you might take a picture that looks too dark or bright, even if enough light is available.
Internal Light Meters for Photography
Internal light meters (or exposure meters) are essential for photography, especially for those who shoot with film cameras or prefer manual exposure control. These light meters are typically built into the camera body or incorporated into an accessory that attaches to the camera. They are designed to measure the amount of light in a scene.
The internal camera light meter is used for:
- A photography exposure meter can provide valuable information about the exposure settings needed to capture a well-exposed image by measuring the light in a scene. This includes the shutter speed, aperture, and ISO settings to produce a properly exposed image based on available light.
- A light meter can consider the specific characteristics of the camera being used. This means that the meter can factor in the lens aperture and the sensitivity of the film or sensor to provide more accurate exposure recommendations.
What is a Light Meter in Photography, and How does it Work?

Let’s start with the beginning. Let’s talk about the ideal exposure.
The ideal brightness in your photos is medium-gray – or 18% gray, to be specific. In a nutshell, an 18% gray is a gray that reflects 18% of light.
When you allow the camera to adjust exposure using one of the semi-automatic modes, it will automatically adjust by brightening or darkening the exposure, depending on the situation. So when your photo is underexposed, it will automatically brighten it to 18% gray.
Something similar happens in manual mode; the difference is that YOU have to change the settings until the photo reaches that desired 18% gray.
Sharpen Your Photography Skills in One Afternoon
Download my free guide with 10 expert techniques that took me years to master. You’ll discover the simple shifts that separate amateur shots from frame-worthy photos.
Join 300+ photographers already leveling up their skills
When metering, what are you asking the camera to do exactly?
Metering means asking yourself which part of the exposure you want your camera to measure the light from – the center, the subject, what’s in focus, or the entire scene.
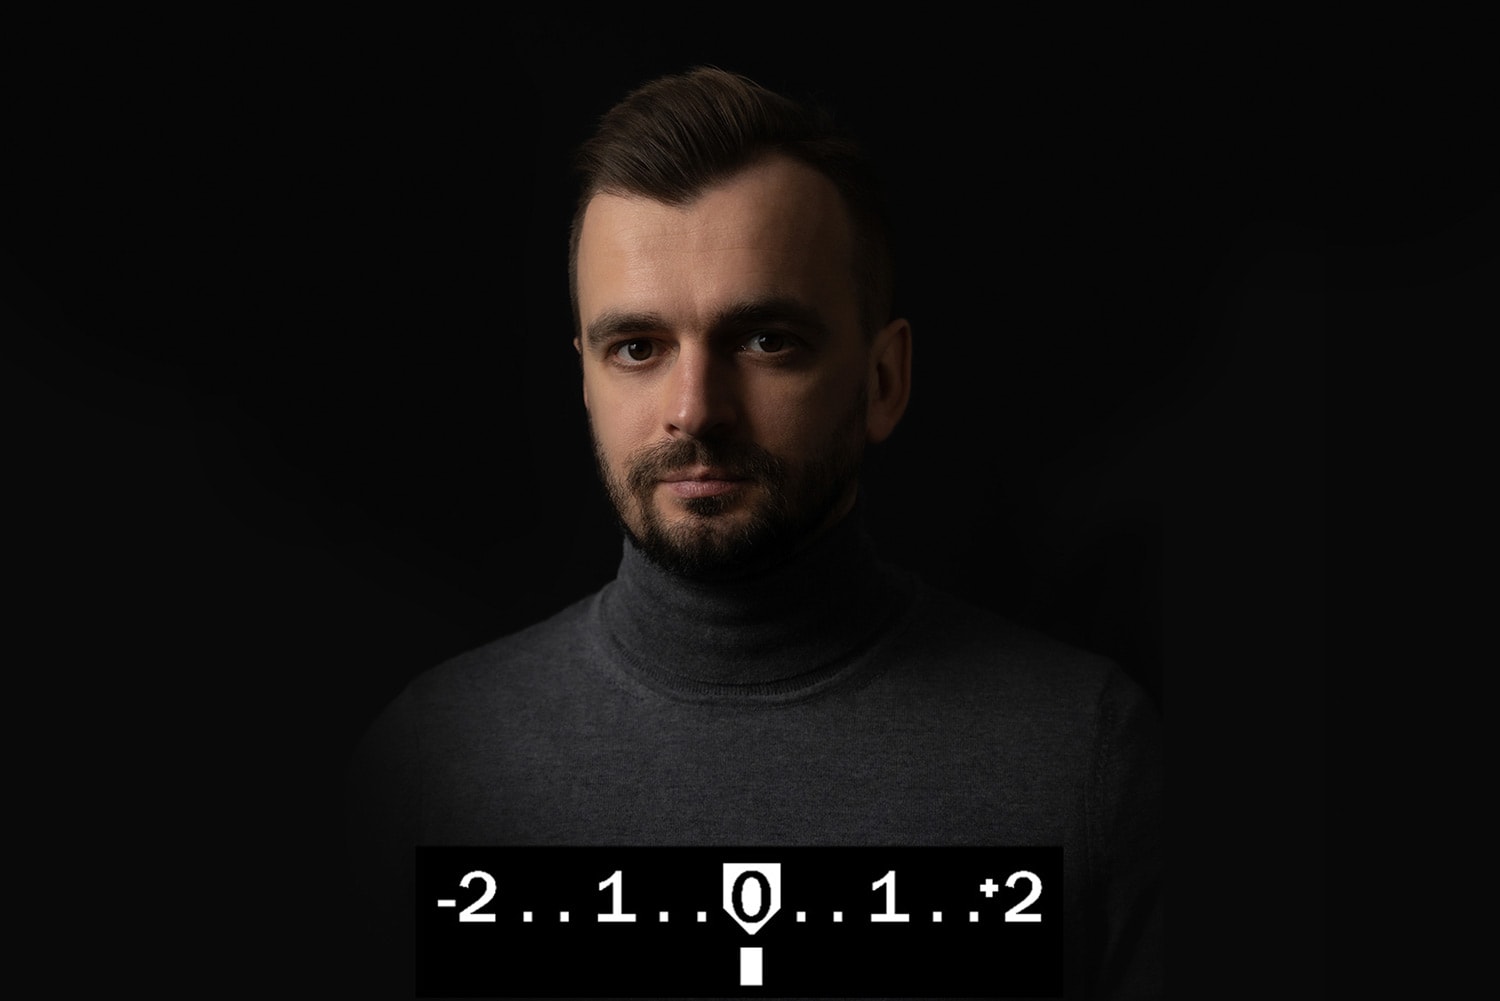
How to read a light meter?

The light meter depicts how your camera views exposure, and understanding how to read it is crucial to taking well-exposed photographs.
A photography light meter is represented as a line with a central zero and the numbers 1, 2, and 3 on either side. Each of these numbers corresponds to a full stop of exposure, and the farther you move from the center, the more over or underexposed your photo will be.
The scale contains values from -3 to +3, where the 0 value represents the desired 18% medium-gray.
- +1,2,3: the image gets brighter
- -1,2,3: the image gets darker
Where can you find your light meter?
You can find your light meter:
- When looking through your camera’s viewfinder
- In the camera settings display
In manual mode:
- Press the shutter button halfway
- An “indicator” will appear under the light meter
Understanding Metering Modes: Evaluative, Center-Weighted, and Spot Metering

It’s essential to understand the differences between each mode and how they can affect the exposure of your shot. Ultimately, your chosen mode will depend on what kind of shot you want to take.
Let’s take a look at each:
Matrix or evaluative metering
Matrix or evaluative metering is a sophisticated mode most modern digital cameras use. This mode measures the light intensity in multiple areas and analyzes light distribution to determine the best exposure settings.
Examples:
- Shooting a landscape with a bright sky and darker foreground: Matrix metering would consider both the bright and dark areas to expose the entire scene properly.
- Taking a portrait with a busy background: Matrix metering would analyze the entire scene and adjust the exposure to ensure the subject is properly lit while maintaining detail in the background.
- Shooting a scene that has many important elements
Center-weighted metering
Center-weighted metering places the most emphasis on the central part of the frame. This mode takes an average reading of the entire scene but assigns more weight to the center area.
Examples:
- Taking a portrait of a subject in a uniform background: Center-weighted metering would help ensure the subject is exposed correctly while still considering the surrounding area’s lighting.
- Shooting a still life with a plain background: Center-weighted metering would help balance the exposure across the scene.
- Shooting an artist singing on stage – center metering will ensure that the subject is highlighted.
- Emphasizing something in a frame
Free Lightroom Course for Parents. Create Natural, Professional Family Photos
Learn how to make your family photos bright, natural, and frame-worthy, even if you’re brand new to Lightroom.
Spot metering
Spot metering measures the light intensity in a small area of the scene. This mode is useful when the subject is backlit or in difficult lighting conditions.
Examples:
- Taking a portrait of a subject with a bright background: Spot metering would take a reading from the subject’s face, ensuring the face is exposed adequately while maintaining detail in the background.
- Shooting a bird or animal against a bright sky: Spot metering would take a reading of the subject and ensure it is correctly exposed while maintaining detail in the bright background.
- Shooting a bright moon against a dark night sky
- Shooting a subject near a window
Light Meter Photography: How to Pick a Metering Mode
I’m going to show you different situations and recommended metering modes to get the correct exposure:
Moving subject

Recommended metering mode:
- center-weighted
- evaluative metering
B&W (Black and White Photo)

Recommended metering mode:
- center-weighted
- evaluative metering
Homogenous subject / even tone

Recommended metering mode:
- Spot metering because you want the subject to stand apart
Landscape

Recommended metering mode:
- Evaluative metering to get in all the scene
You don’t want to have your subject focused necessarily. Don’t want to have the sky overblown

Recommended metering mode:
- Evaluative metering to capture more of the scene.
When you only care about your subject (not the background)

Recommended metering mode:
- Spot metering
Fine-Tuning Exposure: Using Exposure Compensation with Internal Light Meters
Exposure compensation is a tool that allows photographers to adjust the exposure of their photos beyond what the internal light meter on camera automatically decides.
In some situations, the camera exposure meter may be tricked by large areas of white or black, resulting in underexposed or overexposed shots. This is where exposure compensation comes in handy.
Exposure compensation is typically accessed through a button or dial on the camera body and is represented by the symbols + and -. It is used by adding (+) or subtracting (-) stops of exposure compensation depending on whether the shot looks dark or too bright.

Most cameras cover 4-5 stops of compensation when shooting in A/Av, S/Tv, or P modes. However, you cannot use it in the manual, auto, or dedicated scene modes.
Exposure compensation works differently in different camera modes, and it is essential to be aware of its effect on the automatic parts of the settings. For example, in Shutter Priority mode, exposure compensation will alter the size of the aperture. In contrast, in Program mode, the camera will change the shutter speed based on the exposure compensation.
It is crucial to be mindful of this to avoid any unwanted effects on the photo.
Free Lightroom Course for Parents. Create Natural, Professional Family Photos
Learn how to make your family photos bright, natural, and frame-worthy, even if you’re brand new to Lightroom.
Why use Manual mode for metering?
Manual mode metering allows you to control your camera’s exposure settings more by independently setting the aperture, shutter speed, and ISO. When doing this, you won’t have to use exposure compensation.
In manual mode, you can also choose the metering mode. By default, most cameras use multi-zone metering, which averages the exposure across the entire scene.
However, in manual mode, you can choose spot metering, which measures the light at a specific point in the scene. This can be useful for subjects with a wide range of brightness, such as a portrait against a bright sky.
How to set your exposure in manual mode by using your light meter:
- Set your metering mode to spot or partial
- Point spot at what you would consider being a medium-gray in your image
- Manually choose your settings (aperture, shutter speed, and ISO), so the meter reads a 0 on the metering scale.
Congratulations! You’ve successfully manually set your exposure to an ideal medium-gray
Beyond Internal Light Meters: External Light Meters and Other Tools for Advanced Metering.

Some experts argue that you don’t need an external light meter, while others might disagree. The truth is it depends on what you’re going for. The advantage of an external light meter is that it can speed up your photography process and is a great educational tool that can teach you how to understand light better. However, the best light meter for film photography may have different requirements than those for digital photography.
Here are some external light meters and other tools that photographers can use for advanced metering:
Incident Light Meters: Incident light meters measure the amount of light falling on a subject rather than the light reflected by the subject. This can be useful when metering for difficult lighting situations, such as backlighting or scenes with highly reflective surfaces.
They are also particularly suitable for street photography thanks to their ability to quickly assess a scene.
If you’re looking for something more affordable, an incident meter can be a budget light meter for photography.
Spot (reflective) Meters: Spot meters allow photographers to measure specific areas. This can be useful when the photographer wants to meter a particular part of a scene rather than the entire scene. More specifically, these meters work by measuring the amount of light reflected off of a specific area of your subject.
Reflective meters are an excellent option for those who want to avoid wasting film (and time) by taking multiple shots of the same scene. To ensure the perfect exposure, taking readings from both the brightest and darkest areas of your scene is recommended.
Light Meter Apps: If you’re looking for a light meter app for photography, many are available for smartphones – and they’re especially handy for light meter film photography. These apps use the camera on the phone to measure the light and provide exposure recommendations. Some good photography light meter apps include Pocket Light Meter or Lux Light Meter Pro.
Other ways of metering:
Grey Cards: Grey cards are a neutral shade of grey that you can use to set the exposure for a scene. By taking a meter reading from a grey card, photographers can ensure that the exposure is correct for the lighting conditions.
PRO Tips
- Keeping your exposure within a 1-stop range on your light meter is generally advisable.
- It’s important to know that the terminology for light metering can vary between Nikon, Canon, and other camera brands. To determine the most suitable metering mode for each situation, I suggest you refer to your camera’s user manual and menu settings.
Sharpen Your Photography Skills in One Afternoon
Download my free guide with 10 expert techniques that took me years to master. You’ll discover the simple shifts that separate amateur shots from frame-worthy photos.
Join 300+ photographers already leveling up their skills
Light Metering FAQs
How accurate is a light meter?
The accuracy of an exposure meter in photography depends on various factors, such as the quality of the meter, the calibration of the sensor, and the conditions of use. Modern digital light meters are pretty accurate and can provide reliable readings within a reasonable range of lighting conditions.
However, it’s essential to remember that no meter is perfect, and some variability in readings can be expected. The best light meter photography will also depend on your personal choices and “feeling” as well.
What is the best metering mode for indoor?
The best photography light meter mode for indoor photography will depend on the specific lighting conditions and the desired effect:
The evaluative or matrix metering mode is a good starting point. It considers the entire scene and calculates the exposure based on various factors such as brightness, contrast, and color. However, spot or center-weighted metering may be more appropriate in some cases, mainly if there is a significant variation in lighting across different areas.

What do the readings on a light meter mean?
The readings on a photography light meter indicate the amount of light falling on the sensor or film in a particular scene.
Typically, the meter will display a numerical value, such as f/stop or shutter speed, which indicates the recommended exposure settings for a given lighting condition.
The specific value will depend on the metering mode, the sensitivity of the sensor, and any exposure compensation that has been applied.
Is it worth buying a light meter?
Whether or not it’s worth buying an external light meter will depend on your specific needs and preferences as a photographer. A light meter can be essential for achieving accurate exposures and consistent results for some types of photography, such as studio work or film photography. They can be a nice addition to your product photography equipment.
However, an external light meter may not be as necessary for other types of photography, such as casual snapshots, natural light portraits, or outdoor landscapes. The best light meter for photography depends on your shooting style and goals.
How Internal Light Meters Work: Conclusion
Internal light meters for photography are essential for those who want to ensure that their images are correctly exposed and can capture the full range of light in a scene.
A reliable internal light meter on camera can help you produce consistent, high-quality results in bright or low-light conditions. To learn more about photography and master the many skills that accompany it, check out our Photography Basics section here on OHMYCAMERA.