

When I first picked up a camera, I was so captivated by my subjects that I hardly paid any attention to the seemingly insignificant space surrounding them. I was yet to realize that this overlooked expanse, known as negative space, could hold as much power and influence as the primary subject.
Over time, I’ve come to appreciate the power of negative space in photography. And it’s time to show you how it can dramatically transform your photographic artistry.
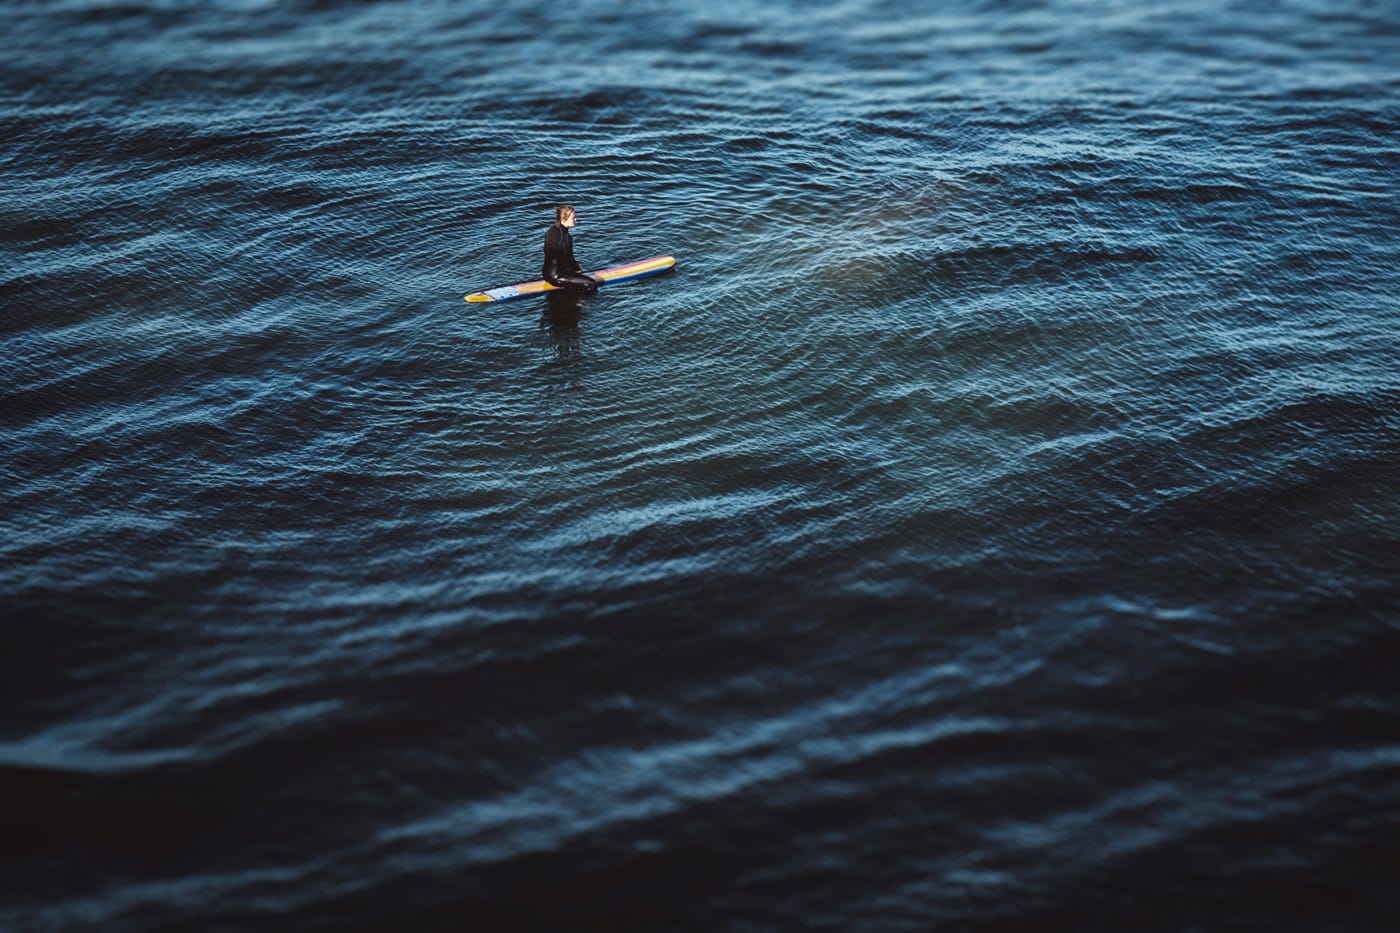
What Is Negative Space in Photography?
Negative space in photography is often compared to providing ‘breathing room’ to a subject. This breathing room lets the subject’s form manifest unhindered, accentuating its significance and allowing its shape to contribute to the overall image more effectively.
When you use negative space, you’re embracing simplicity in your composition – by maybe adding more sky, unadorned wall sections, or blurred areas that create a contrasting backdrop to your main subject.
Simply said, when a subject is surrounded by negative space, it lets the viewer readily perceive its visual importance relative to other elements in the frame.
What Is an Example of a Negative Space Photography?
An example of negative space photo could be the vast, empty sky in a landscape photograph where a single tree stands or the blank wall behind a person in a portrait.
When it comes to negative space photography examples, think of photographers such as Chris Burkard or Lizzie Pierce.
Known for his stunning landscape and adventure photography, Chris effectively uses empty space to underscore the magnitude of nature and the insignificance of humans within it.
In comparison, Lizzie Pierce creatively applies negative space in her portrait photography, focusing the viewer’s attention on the subject while providing a sense of context.
Sharpen Your Photography Skills in One Afternoon
Download my free guide with 10 expert techniques that took me years to master. You’ll discover the simple shifts that separate amateur shots from frame-worthy photos.
Join 300+ photographers already leveling up their skills
Negative Spaces and Minimalism
Negative space is a vital aspect of minimalism in photography, as it aids in reducing distractions and cutting clutter out of an image. Humans are naturally drawn to simple shapes, and negative space leverages this inclination to capture – and hold – a viewer’s attention.
How Do I Create a Negative Space in a Photo?
As mentioned, creating space involves composing your image in a way where a large portion of the image is left unoccupied. Here are some more specific ways to do that:
#1. Use Objects or Patterns as Negative Space
Negative space can be more than just an empty background; you can also fill it with objects or patterns that don’t draw attention away from the main subject. These objects or patterns can enhance the composition by providing texture, depth, or scale.
For example, when photographing a person in a field of tall grass, the grass can become a negative space. It doesn’t detract from the main subject (the person) but adds depth and texture to the overall image.

#2. Balance Negative Space With Positive Space
Negative space and positive space should work together to create a harmonious composition. Too much negative space might make your subject seem lost, while too little can make the image feel cluttered.
A popular method to achieve balance is using the “Rule of Thirds”. This rule divides the frame into nine equal rectangles, and the subject is placed at one of the intersections of these lines, leaving the rest as negative space.
#3. Consider Other Elements in the Scene
When creating negative spaces, it’s essential to consider other elements in the scene that could either enhance or detract from your subject.
For example, vibrant colors or complex patterns in your negative space could pull focus from your subject, while complementary colors or simple patterns could enhance it.
If you’re photographing a red apple on a blue background, the color contrast can enhance your subject. But if there are other bright red objects in the background, they might distract from your main subject.
RECOMMENDED ARTICLE
Beyond Black & White: The Impact of Color Theory in Photography
Dive into our comprehensive guide and explore how color theory shapes your photographs. Transform your work with fresh perspectives on hues and harmony.
#4. Play With Lights and Shadows
The use of light and shadow can also create compelling negative space. By manipulating light, you can cast shadows that provide a contrast to your subject, further highlighting it.
For example, a portrait taken during the golden hour can result in long shadows cast by the subject, creating an atypical negative space. Alternatively, backlighting a subject can create a silhouette, making the entire background negative space.
Remember, in photography, not everything has to be illuminated. Sometimes, the absence of light can make an image stand out.

#5. Play With Negative Space in Post-processing
Post-processing is crucial in creating beautiful negative space in photography – you can use various photo editing tools to enhance or adjust it in your image.
One such technique is cropping. By cutting out unnecessary elements, you can put more focus on your subject and create more negative space around it.
For example, if you have an image of a bird in flight but can see other birds in the background, cropping the image to only feature the bird in flight can create a striking image with ample negative space.

#6. Use a Long Lens
Longer lenses have a narrower field of view compared to wide-angle lenses. This helps you isolate your subject and exclude potentially distracting elements from the frame, creating more negative space. Long lenses also compress the scene, making the background appear closer and bugger relative to the subject.
Finally, these lenses create a shallower depth of field at the same aperture, which means that your subject can be in sharp focus against a beautifully blurred background (which can serve as your negative space)
Is Negative Space Empty Space?
Negative space doesn’t have to be devoid of anything. Instead, it’s about making the primary subject stand out by not competing with it.
Let’s take an example of a forest. If your main subject is a lone tree, the forest may serve as negative space, pushing your visual attention towards that individual tree. The forest is present, but it doesn’t take center stage.

What Is Positive and Negative Space Photography?
In essence, photography is a dance between positive and negative space. Neither can exist without the other and the harmony between the two weaves the magic of compelling photographs. So let’s see what is positive vs negative space photography.
We’ve seen that negative space is the world the subject interacts with — the background, the emptiness, the unoccupied areas.
On the other hand, positive space is the area that your subject inhabits. Every time you click the shutter, you capture a moment, freezing your main character in the positive space. They are the stars of your show — the laughing child, the majestic eagle in flight, the droplet of water suspended in mid-air, the towering cityscape.
Consider an example where you’re photographing a child against a vast, open sky. The child, filled with innocence and joy, is your positive space. But the expansive sky, the negative space, underscores the child’s smallness in the grand scheme of things. It might invoke feelings of awe, infinity, or a poignant sense of solitude.

Techniques to Effectively Make Use of Negative Space in Photography
To create a compelling image with enough negative space, photographers use a variety of techniques:
Using the Rule of Thirds
The ‘Rule of Thirds’ is a photography technique that divides a scene into nine equal parts, placing crucial elements along the lines or intersections for a balanced composition.
Combining the rule of thirds with the concept of negative space, we can create a truly captivating image. The negative space highlights the subject placed according to the rule of thirds, creating a compelling composition with a clear focus.
For example, consider a photograph of a single tree against a clear sky. The tree is the main subject, but the clear sky – the negative space – helps to draw the viewer’s attention to the tree and enhances its impact.

Using Depth of Field
In some scenarios, photographers may not have ample negative space to work with. In this case, they can manipulate the ‘Depth of Field’ to create a pseudo-negative space. Depth of field refers to the range in an image that appears sharp.
By using a wider aperture, photographers can blur the background while keeping the subject sharp and in focus. This creates an illusion of negative space and directs the viewer’s attention to the subject. For example, macro photography often makes use of this.
Negative Space in Photography: FAQs
Negative space is good in photography because it simplifies the image and reduces visual clutter. In my personal experience, it helps to emphasize the main subject, direct the viewer’s attention, and can even be used to evoke certain emotions or tell a specific story. As the famous painter Hans Hofmann once said, “The ability to simplify means to eliminate the unnecessary so that the necessary may speak.”
To use negative space effectively, I suggest you first identify your subject and then find a way to isolate it within the frame. You can achieve this by adjusting your angle, selecting an appropriate background, or manipulating your depth of field. Remember, negative space does not necessarily need to be white or empty – it just needs to be less visually complex than your subject.
The best use of negative space is subjective and depends on the story you want to tell with your photo. In my opinion, it’s most effectively used when it not only adds balance to your composition but also contributes to the overall mood, theme, or narrative.
How to Use Negative Space to Improve Your Photography: Final Words
When wielded with intention and creativity, this tool can profoundly impact your photographs. So remember – what you choose to leave out can be just as important as what you choose to include. So leave negative space photography elevate your photos.
And if you want to know more about what elements to add to balance things out, read our other articles at OhMyCamera.